Total Time Needed: 2-3 Hours
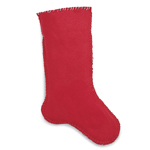
This personalized stocking will bring lots of smiles on Christmas morning.
Materials
- Scissors
- 2 pieces of red fleece, each 24 by 16 inches
- 2 pieces of white faux fur, each 24 by 16 inches
- Long sewing pins
- Large-eye sewing needle
- Red embroidery floss
- White embroidery floss
- Sheet of yellow felt, 9 by 12 inches
- Yellow embroidery floss
- Fiberfill
- Fabric paint
- Clear tape
- 9 inches of white twist cord
Instructions
1. The Basic Stocking: Click here to download the classic stocking pattern.
2. Cut 1 stocking shape from each piece of the red fleece and 1 from each piece of the faux fur. Be sure to cut the fur stockings so that the toes point in opposite directions with the fur sides up.
3. Pin together the stockings with the fur stockings on the inside, furry sides in, and the red stockings on the outside.
4. Whipstitch (see page 131) around the edge with the red floss to sew the shapes together, leaving the top unsewn.
5. At the top, sew together the front 2 edges, then the back 2, with the white embroidery floss.
6. Fold down the top to make a cuff.
7. The Trimmings: Cut 2 star shapes from the yellow felt.
8. Use the yellow floss to whipstitch around the edges, sewing the stars together. Leave a small section unsewn.
9. Stuff the star with fiberfill, then finish sewing the edges.
10. Write your child's name on the star with fabric paint and sew it to the edge of the cuff.
11. Tape the ends of the cord to keep them from fraying, then sew the cord to the stocking for hanging.
Tips:
A Stitch for All Stockings
Thread your needle with a length of floss and knot one end. Begin sewing by pushing the needle up through the underside of the fabric and then out the top. Loop the needle back under the fabric and repeat the stitch.
Crafts


